Its always useful to refer back to source material and I remembered that I had taken these pictures a couple of years ago.
There is still quite a bit of detailing add to the ends when you compare to the photos above.
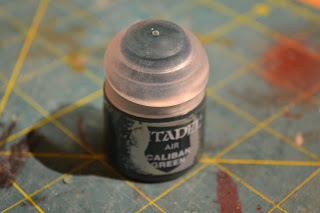
Now I realise that for some people getting the right shade of green is not important, but for me colour is really important. The very few colour photos of the Ffestiniog in the interwar period show a slightly bluer shade than that used in the photos above but that is probably as much to do with the film quality as anything. I want a slightly drabber and bluer shade for my carriages but ideally a ready mixed paint. Whilst in Games Workshop with my son this week, I noticed a green that looks very promising. It's called 'Caliban' green and his available in an airbrushable mix. It's certainly closer to what I want than the existing Tamiya or Humbrol colours. I will use it for a first coat and see!
The bogies have had couplings added and I have tested that there is enough rotation for the sharpest radius on the line.
The carriage is now sprayed in grey primer but there are still steps and a few other details to add. I'm going to see if I have any Archers rivet transfers left to add detail to the sole bar.I can't wait to see it sprayed green. Malcolm's cast sides really are exquisite. The only downside is the weight of the model, with gradients on my model I don't think my England Loco will be able to pull more than two of these.

RAILS TO BLACK ROCK A blog about the construction of a 5.5mm scale model of a fictitious Ffestiniog Railway branch line to Black Rock Sands via Borth y gest. This was a railway that was proposed in real life but never built. Although a model railway, the model has an equal focus on the distinctive architecture of North Wales.The picture above gives an overall view of the area of the village being modelled.
Sunday, 31 December 2017
Friday, 29 December 2017
After a bit of thinking time I decided it was easier to remove the side frames from the stretcher and solder them closer together. This required me to make a jig which can be used when I build more. A piece of brass bar has been soldered on to allow the couplings to be fitted later in the same way the that the MSM bogies work.
A finished bogie- I decided not to add any detail as only the very bottom edge is visible beneath the carriage and when under the strong layout lighting is totally obscured. The bogie is very free running and because it is a lot narrower than the MSM bogie, has a lot more room to rotate in the tight space below the carriage. This has freed up another set of MSM bogies to go under one of the carries where they will be visible.
Wednesday, 27 December 2017
Having made the new plain ends to the carriage I dug out some reference material and realised that the original model has an ornate panelled sole bar. I thought I could probably just overlay it with plasticard but this would leave it proud.
So after several deep breaths I took a razor saw to it and cut the sole bar away.
I found this very slow and tedious and plucked up courage to score a deep line with a Stanley knife and then bent the sole bar until it snapped off.I had left about 1mm to file down. This allowed me to check that the top and bottom edges were parallel.
New sole bars were made from Evergreen plastic section and superglued to the bottom edge of the carriage sides
A new plasticard end was made using microstrip.
A Worsley Works etched bogie has been built with shouldered pinpoint bearings. Unfortunately its too wide and the wheel set doesn't fit. The bearings will need to be removed and packed out.
Subscribe to:
Comments (Atom)


