Wednesday 31 December 2014

With a small portion of background scenery looking complete Welsh Pony came out to pose. This building should provide a really interesting backdrop for rolling stock pictures. I think it has shades of the Harbour Station backdrop before the Britania Foundary was demolished.


The small extension has been completed today. The render effect is better than expected now it is set off by the windows.This extension is based on photographs from the 1920's. It doesn't appear in the earlier photo shown at the head of this page and by 1939 it had been rebuilt as a full height extension. Piecing together the layout of the houses suggests it might have been a staircase as it lines up with the very tall windows that appear to be a main stair well. If anyone has further information I would be interested to hear. Several interesting features were discovered talking to the public whilst exhibiting Dulas, this allowed updates and modifications to be made as we went along. Of course having plonked an imaginary railway in the village already, I probably shouldn't be worrying about such details!


Tuesday 30 December 2014

I'm starting to realise that I have massively underestimated the time its going to take to build each house to the standard I want. Almost every building has intricate bay windows and it has taken an afternoon just to build this single bay! But for me its features such as this which are as important as rolling stock in creating the complete picture. I want the houses to be real characters. This is a village where everybody knows each others business, curtains twitch and comings and goings at the station are the centre of village gossip….


Sunday 28 December 2014

A'Blue Peter' guide to window construction…
Once the outer frame has been cut out, a second lamination is marked out to produce the upper sash unit. The lower section is exactly the same size as the outer frame.

 The top sash is aged to the frame, and the lower sash is marked out and cut.
 This creates the distinctive stepped in appearance.
Thin strips of cartridge paper are then cut using a craft knife. These are used to make the glazing bars
The glazing bars are carefully glued into place before the window is painted. The glazing bars in the bottom half of the window can be added once the top half is fully glazed.
This is the first building I have made in 5.5mm scale and the advantages of this scale are really becoming apparent. Without using professionally etched or laser cut windows you can create really well proportioned units.
The bay window and lean-to have been rendered in white pepper. The bay window is a very delicate structure until the glazing material is added. One sash is going to be modelled open to allow for a person to be leaning out and remonstrating with a person on the ground. The ground level at this corner of the building are quite complex with the ground being higher to the right of the ground floor window.


This is the etch for bogie brake van 4/5. This will form part of the 'red' liveried rake. I intend to build all the rolling stock in one go so that each element of the build can be done production line style. I think I will need to order quite a few more door handle etches from Malcolm! Being brass, the carriages will be quite heavy; which should't be too much of a problem as the rakes I intend to run will be of no more than four bogie vehicles in length. The line is on a gentle gradient rising towards the Cricieth end, and if I ever get to build the next section which will see the line winding around the rocky headland, the gradient will be steeper. With this in mind the etched bogies will be fitted with pinpoint bearings.


Saturday 27 December 2014

I've finally got something done! The first window has been added to the cottages. Built up from three layers of thin card to represent the sash, I've used the methods described in the Pendon book of cottage modelling. Its a really fiddly method and i've got a lot of them to do on this building alone. The houses will each have their own paint scheme in suitable period colours. Although not obvious from this angle, the three laminations give a good 3D effect and bring the building to life. This first cottage has two bay windows as well as the lean-to.


Despite there being a break in the blog for the last two months there have been some significant developments. The main one being the delivery of etches for six bogie carriages from Worsley Works. More about these shortly…...

Sunday 2 November 2014


The trackbed has been sprayed with Halfords undercoat sprays with a further coat of yellowy brown track rust colour applied with the Iwata.
The railhead has been cleaned so that it can be tested. The next job is to build up the mud and ballast between the rails. Very few sleepers should be visible by the end, creating a typical Ffestiniog trackbed of the period. Thoughts are turning to the type of grass to be used; a great deal of improvement has occurred in the type of products available since I built Dulas such as the development of static grass technology.
 The facia is undercoated and ready for an application of satin black paint. With these jobs completed the scenery can have my undivided attention.


I am thinking that I might start to detail the trackbed. I have been referring back to the photos of Chris Nevards Catcott Burtle that inspired me to use the C&L track work materials. Like his model a lot of the sleepers will be buried below ballast and general build up of sand and mud.

Saturday 1 November 2014

A re profiled overlay of plywood has been added to the facia correct some of the original miscalculations. The seabed was sloping away from the beach a little too steeply so it has been raised by 15mm at the pier end. The pier / harbour wall is one of the only changes to the landscape other than the trackbed and a little licence has been used to suggest the depth of water would be enough for schooner to tie up to. Borth y gest was in fact a place where many ships were built for the carriage of slate. The re vamped maritime museum in Porthmadog is excellent and well worth a look. Its amazing how the elegant ships were built on the foreshore using rudimentary equipment. Even more fascinating is the amount of ships wrecked on the coast of Wales. I am going to suggest that a small amount of slate might have been loaded there once the ship building had ceased.
The facia has been rolled with grey undercoat ready for a final satin black finish. The back scene has bubbled unfortunately. I have heard of other people having similar problems and thought I had avoided it by using spray mount. It will do for the time being but will need to be replaced before the model is exhibited. I will apply the next one using wall paper paste and allow the paper to stretch...


Thursday 30 October 2014

This week I have been modifying the Amanda Terrace end of the model. Having made the shell of the fishermen's cottages it had become apparent that the road level was too high. So I have removed the road (which is an integral part of the baseboard) and reduced its height by 20mm. The gradient is now gentler and looks much more realistic. This will help if the tramway is laid up the road. Reducing the height of the road has made the rocky sea front slopes gentler. I am reminded of my 'A' level geography teachers often repeated fact that slopes are seldom steeper than 30 degrees in nature!

This is a complex piece of landscape. I want to be true to the original but imagine the trackbed in a convincing way along the sea front. The track will pass where the boats are pulled up on a slate built wall.


Saturday 25 October 2014

A last call for anyone who would like a set of Ffestiniog carriages etched by Worsley Works in 5.5mm scale. Myself and another 5.5mm member have commissioned the etch. If you want a set, contact Allen Doherty at Worsley Works today. This is a rare opportunity due to the need to produce a minimum of two sheets to make the work viable.

Tuesday 21 October 2014


Today I have finally got round to fitting the couplings and roof to carriage 15. The bogies have had to be butchered to get them to negotiate the curve at the top of the loop, but this isn't noticeable when viewed. Modifications to avoid this can be incorporated when I build the next version of this carriage. The roof needs spray painting and the whole carriage will then receive light weathering to suggest a quite run down appearance. I'm tempted to have a go at one of the bug boxes sitting in the kit box! But I shouldn't get too distracted, the cottages come next….

Sunday 19 October 2014

This weekend the etch for the double ended Fairlie arrived from Malcolm Savage. Previously available as a ready to run chassis from the Mike Chinery my only option is to build it myself. It is in fact very similar to the England chassis built last winter. The piston rods are a two piece lamination with a bend at the end where they connect with the crosshead. I am going to use a High Level models 40:1 gear box as I did with Welsh Pony so some modification to frame spacer at the rear of the bogie will be needed. The main difference is the fact that it uses 14mm carriage wheels with cast inserts to represent the distinctive Fairlie wheel pattern. Having previously sung the praises of using Markit wheels with the centre locking nuts, great care is going to be needed to get these wheels to work as well. I am going to build one motorised bogie, with the second having pick ups only, as I am sure this will provide ample power for the type of trains I am going to run.

What is particularly nice about the etch is the inclusion of details for the loco body, tank filler handles and best of all Fairlie pattern spectacle plates. The latter was going to be a real fiddle scratch building. So depending upon whether the carriage etches arrives, the Fairlie could be the next project once the fisherman's cottages are finished.

Sunday 12 October 2014

The fluorescent lighting has been replaced with five daylight bulbs. The low voltage one gives a very good light but is much more expensive than the old style bulbs that can still be picked up on the web for a couple of quid.
What a difference the daylight bulbs make, these snaps show the difference. the greens and reds suddenly start to look right and the sky becomes much more vibrant. 

I haven't had time to fiddle with aperture to get really good pictures, but these shots are hinting at what is possible when the colour balance is right. The loco green looks much more as I envisaged it. The next job is to complete the front pelmet. Rather than leaving it till last I am going to get it painted and the sign writing applied. There seem to be a number of very good websites offering vinyl lettering at a reasonable price. The model is currently sitting in a corner of the living room so making it look tidy is important ! I am hoping to persuade my wife to make the front curtain, this will really set it off properly…..

Tuesday 7 October 2014

The weekend was spent experimenting with lighting. Not the most exciting job, but I have come to the conclusion that the fluorescent tube must go. It is giving too pink a light. I am going to replace it with a row of five 100W daylight bulbs. You can see the light is to warm when yo compare the colour of the render on the real building and the model. In daylight the model colouring is almost spot on. 


It has also become clear that the gradient of the road needs to be reduced  slightly so that it matches the front elevation of the houses above. The road is part of the main structure of the baseboard so some careful surgery will be required. Reducing the gradient will also make it more possible to include tramway style track up the road. This would have been a more likely route if the railway had gone round the rocky headline towards Black Rock Sands. By including it I will keep my options open if I eventually model the headland below St Cyngars church. 

Sunday 28 September 2014

A few reminders from earlier on in the summer, of why the Ffestiniog still captures the imagination.

The new signal box at sunset in early August. The station has little of the nostalgia that I remember from childhood but the impressive new track layout does have it own charm. The new platform has less detrimental effect on the station than I had expected. It's the canopy and treatment of the actual station building which is really sad and out of character. Penrhyn remains my favourite location, I think the building will have to be the inspiration for the station I build for Borth y gest.

The McKenzie and Holland signals really look the part. Carriage 17 had just come out of the paint shop. It smelt fantastic! I really like this livery and can foresee a rake of 'Woolworths' liveried stock making it onto the model eventually. 

As you will have seen, the blog has taken a back seat in the last few weeks. As a head teacher my summer was taken up organising hot meals for my schools following the best laid plans falling through mid August. Summer 2014 will be remembered as the holiday thwarted by Nick Clegg and his free school meal ambitions. To top it all, this week Ofsted came calling! With this little hurdle successfully out the way, I am looking forward to a little more time tinkering away at the model this winter.

The curved back scene has been completed with grey primer and handles to aid positioning.
 The back scene papers were applied using spray mount. This seemed to go well, and avoided any nasty air bubbles. 
The completed panels. I have filled the top space with expended foam to give further strength.
The model has been moved into one of the downstairs rooms so that it can be worked on over the winter. A purpose built room will be created in the garage next summer.
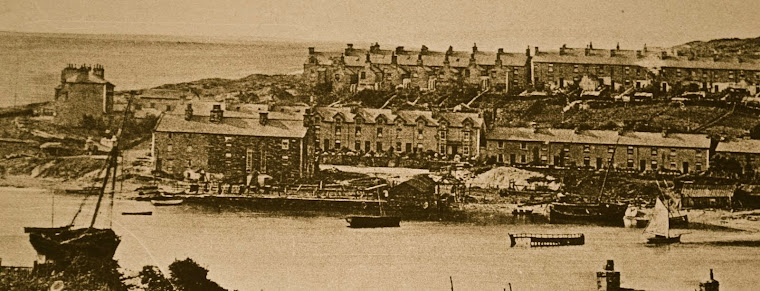
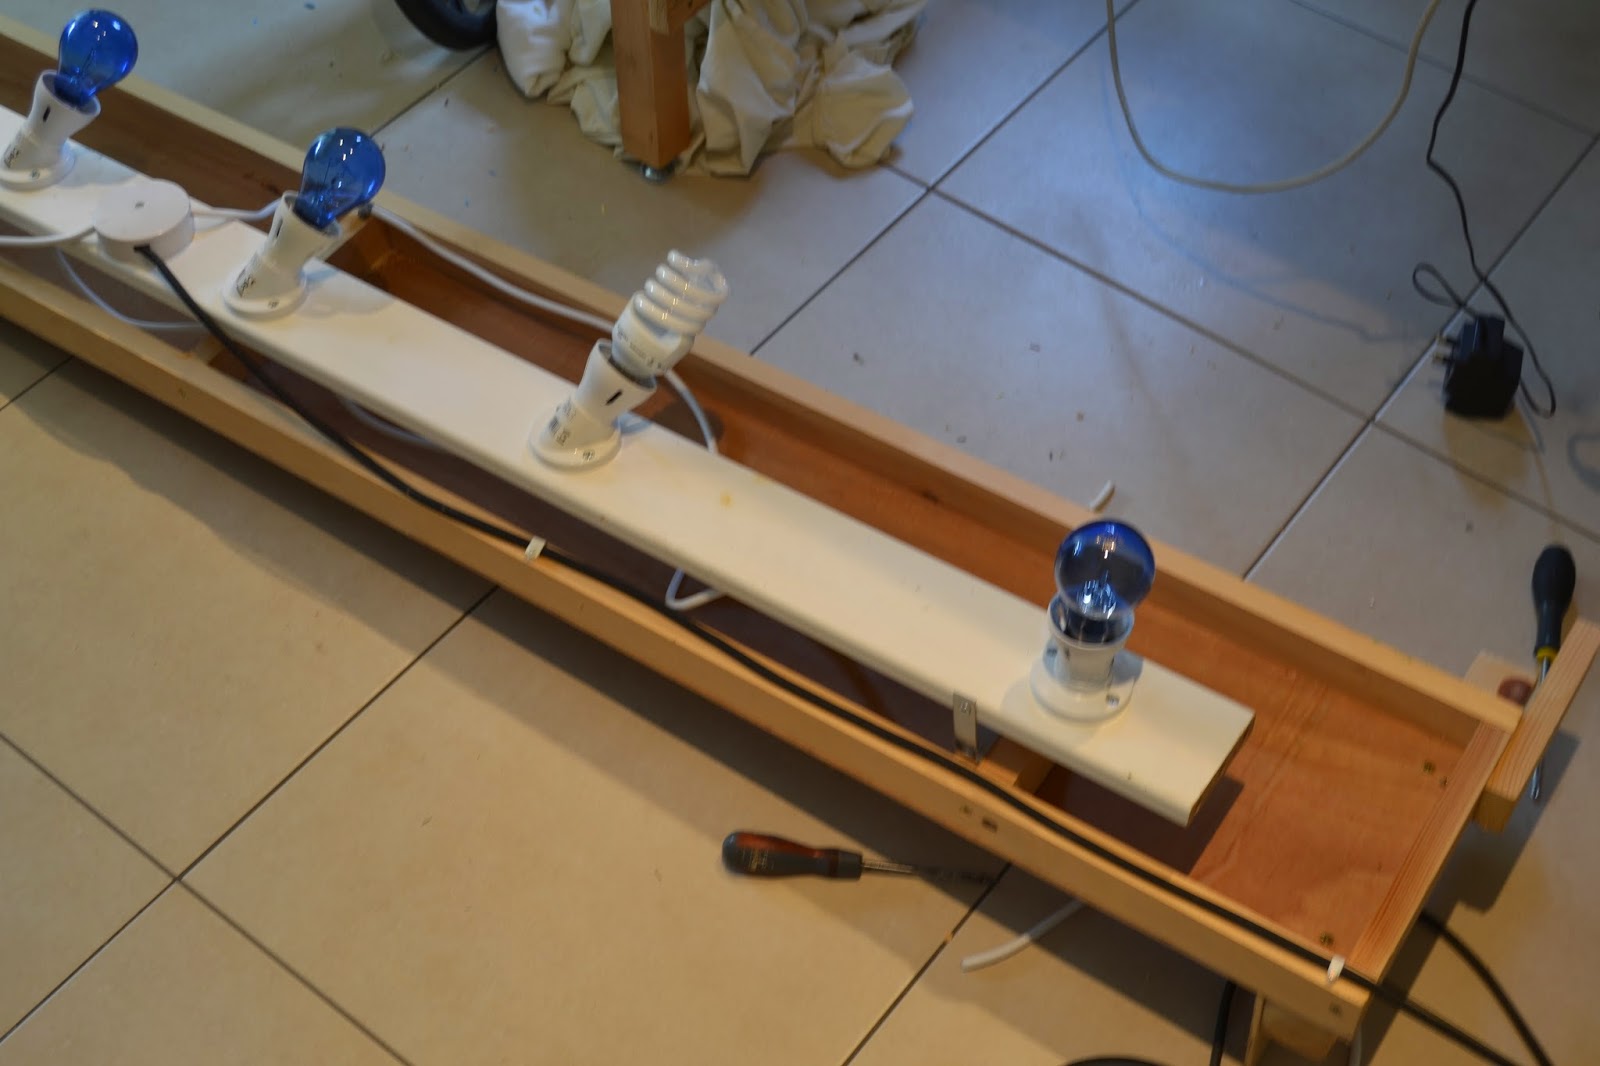
The moment of truth, would the colours look right?  Well I think so. The model is now really starting to come to life. I can't wait to see the scenery developing. I am going to experiment adding further day light bulbs in the next week to sharpen the lighting further. The pelmet is going to be painted satin black and the legend 'Rails to Black Rock' added. The row of cottages will then receive windows and roof.


Friday 29 August 2014

The last few days have been used to work on the base boards. I have constructed the back scene board. The aim is to have a single curving back scene without breaks. This means that the structure has to be light but very strong and able to keep its shape. I have used thin plywood with curved formers behind to hold the curve. Eventually a second skin will cover the formers creating a structure rather like a modern door. It has to be said that at the moment the woodwork behind the scenes is a bit rough and ready but this will be hidden once the final layer is added. This is the largest single component of the baseboard but should easily fit into a transit van. The display surface now needs to be filled, primed and sanded before the printed sky is applied with spray mount.


I really dislike back scenes that have sharp corners and very obvious joints, so creating something seamless was a priority in designing the baseboards from the start. Although I am using proprietary printed sky sheets, I have the option of overlaying them with a more bespoke scene eventually.

Tuesday 26 August 2014

I realise that this is probably bordering on the 'obsessive compulsive' end of the railway modelling spectrum, but hopefully these photos will inspire others to have a go at scratch building!  
The sea facing elevation has been painted with thinner washes of acrylic, letting the different pigments run into each other. The colouring is based around black mixed with burnt sienna. A further proportion of the stones are then washed over with a greeny grey. Looking at the photos of the prototype it is surprising how much orange brown there is in the slate colouring. When viewed from a distance it balances out to give an impression of simply grey slate.

 This is the transition between the quite geometric slate and mortar wall and the more rubbly later addition. This is very clear on the sepia photo at the top of this page.
This end elevation is so distinctive and will be the backdrop to so many views of the station, it simply had to look right. The blanked off fire places of the unbuilt next house in the row are clearly visible.

A close up of the colour wash technique. Many stones have a darker wash at one end to give extra depth. This is a technique described in the 'Modelling Cottages for Pendon' book I am referring to. These walls were hard to get right as they are quite rough in real life and if painted too perfectly give a far too plastic and 'modelly' look.