Friday 29 August 2014

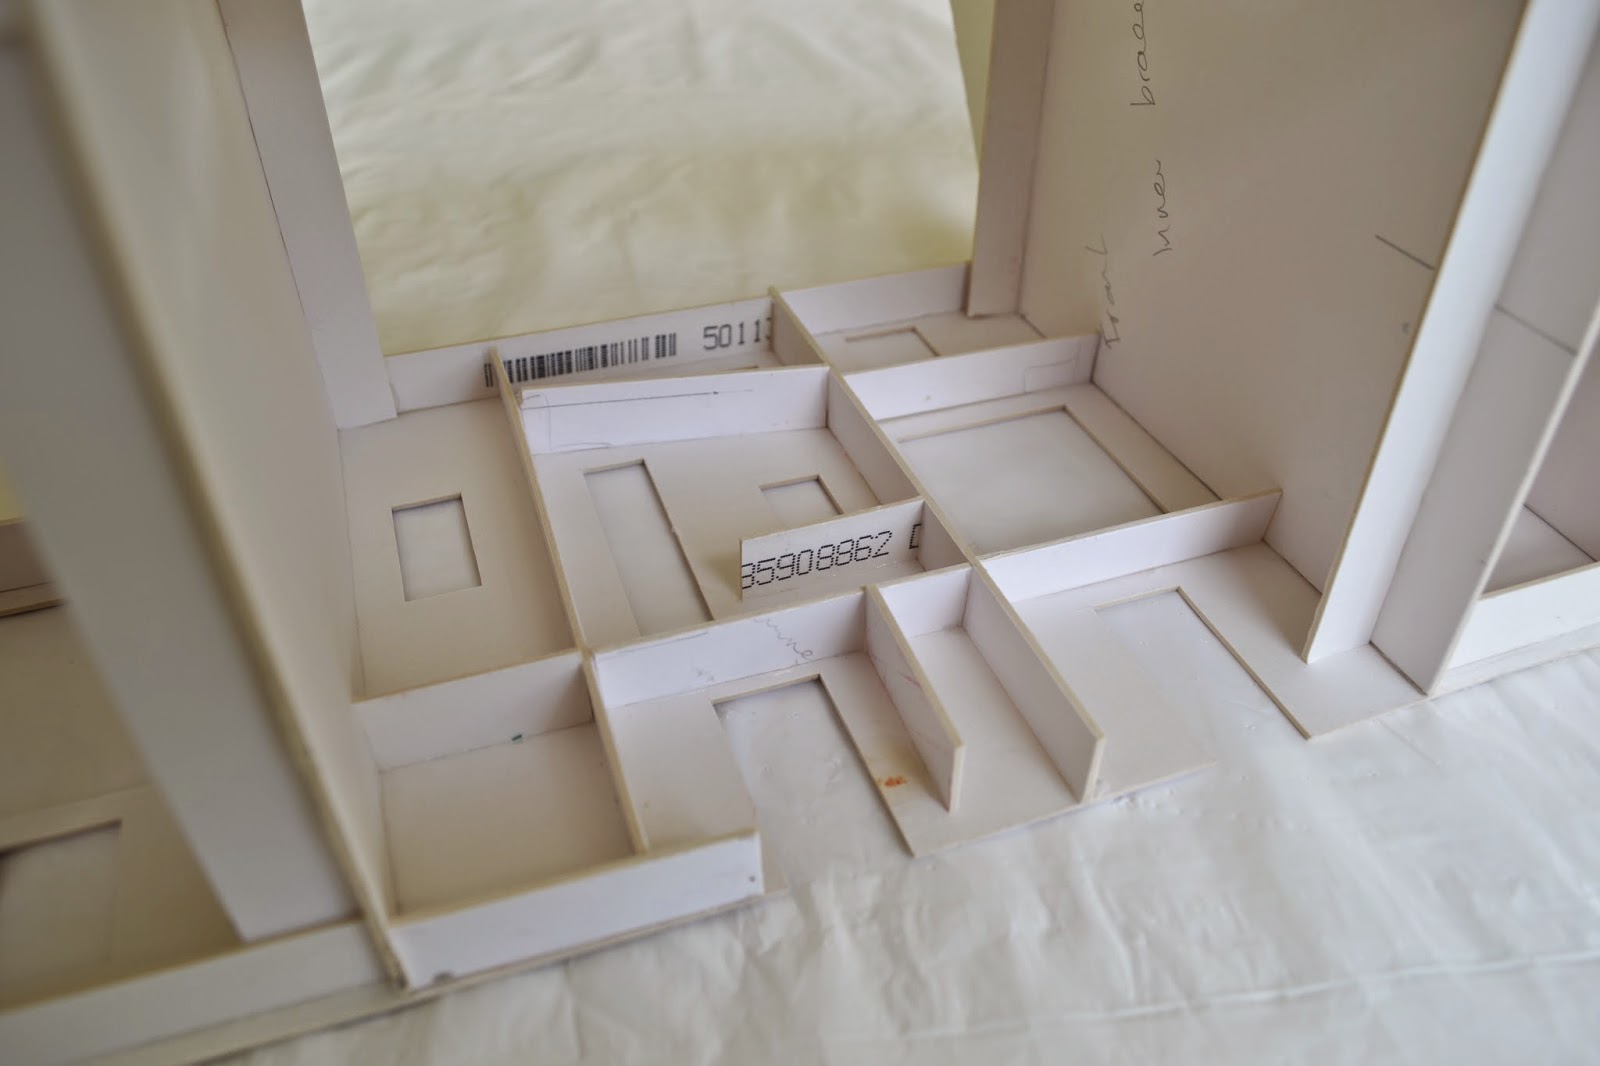
The last few days have been used to work on the base boards. I have constructed the back scene board. The aim is to have a single curving back scene without breaks. This means that the structure has to be light but very strong and able to keep its shape. I have used thin plywood with curved formers behind to hold the curve. Eventually a second skin will cover the formers creating a structure rather like a modern door. It has to be said that at the moment the woodwork behind the scenes is a bit rough and ready but this will be hidden once the final layer is added. This is the largest single component of the baseboard but should easily fit into a transit van. The display surface now needs to be filled, primed and sanded before the printed sky is applied with spray mount.


I really dislike back scenes that have sharp corners and very obvious joints, so creating something seamless was a priority in designing the baseboards from the start. Although I am using proprietary printed sky sheets, I have the option of overlaying them with a more bespoke scene eventually.

Tuesday 26 August 2014

I realise that this is probably bordering on the 'obsessive compulsive' end of the railway modelling spectrum, but hopefully these photos will inspire others to have a go at scratch building!  
The sea facing elevation has been painted with thinner washes of acrylic, letting the different pigments run into each other. The colouring is based around black mixed with burnt sienna. A further proportion of the stones are then washed over with a greeny grey. Looking at the photos of the prototype it is surprising how much orange brown there is in the slate colouring. When viewed from a distance it balances out to give an impression of simply grey slate.

 This is the transition between the quite geometric slate and mortar wall and the more rubbly later addition. This is very clear on the sepia photo at the top of this page.
This end elevation is so distinctive and will be the backdrop to so many views of the station, it simply had to look right. The blanked off fire places of the unbuilt next house in the row are clearly visible.

A close up of the colour wash technique. Many stones have a darker wash at one end to give extra depth. This is a technique described in the 'Modelling Cottages for Pendon' book I am referring to. These walls were hard to get right as they are quite rough in real life and if painted too perfectly give a far too plastic and 'modelly' look. 

Friday 22 August 2014

The front elevation has finally been completed. The colours really do match exactly in real life!

Wednesday 20 August 2014

Anyone interested in having a sheet of Ffestiniog carriages etched by Worsley Works should contact Allen Doherty as soon as possible. Allen is producing the enlarged artwork for the following. (The organisation of the sheets as below is not confirmed). A sheet of three carriages including the original artwork of the 009 versions (so drop lights and floors and bogies are included) will be £99. No delivery date has been given yet.

Sheet One:
Bow sider 17/18
Bow sider 19/20
Curley Roof Van

Sheet Two:
Ashbury 21/22 (1896/8)
Brake composite 12 (1929-)
Brake Van (Spooner) 4/5
 

Sunday 17 August 2014

Today has been spent developing the colour palette and painting method to represent the dressed stone elevation of the cottages. I have worked from the photographs of the building to get the colours as close as possible. Painting is carried out in daylight as this ensures consistency between buildings in the future. I use artists acrylics as they build up a nice texture and seal the Das for longevity. 
The whole building was given an initial wash of white and yellow ochre. Then individual stones were painted. It takes about four washes per stone to get the right degree of opacity. The stones within the real wall are made up of lots of different shades. There are flecks of burnt sienna, which although small, effect the overall look considerably. I had thought that the general grey colour would include blue, but after a lot of experimentation I realised that the slate and mortar has a hint of viridian green. To get a natural look a balance has to be struck between accurate painting and the happy accidents that happen from overlaying various washes. Without this, the walls look too pristine and unnatural. This elevation is nearly done but the others are constructed in quite different styles and will need their own solutions. Unusually, apart from some chimney breasts this is the only building on the layout with exposed stone. 
This photo has been the reference point for todays painting. The colours match is much closer than the photo above suggests as it was taken in artificial light.


Saturday 16 August 2014

I've taken the plunge and started to render the end cottage. It's always a bit of a nervous moment when you try a new technique for the first time but the result is looking promising. I had spoken with Gordon Gravett about how he had used this method on his French narrow gauge master piece at the York show, and it seemed like the best option for use on Borth y gest's many rendered houses. The colouring is very good and if a base colour was applied first could be left unpainted on some houses. On this cottage it will be painted cream.


The street elevation has been scribed using the photo below as reference. Whilst not every stone matches exactly the general style is close. The mortar is actually raised on the prototype in a way that is very typical of the area, a contrast to the much rougher walling on the other elevations. I have chosen to scribe the stone courses as I have done on the other walls as I don't think from viewing distance it will show up (this side will never be seen by the general public from the from of the model). The road side of the houses are much more decorative and the stone work is much more formal. The proportions of the windows within the wall look slightly wrong but when you factor in the large overhanging eves it changes the proportions considerably.


Thursday 14 August 2014

It's a very long time since I scribed a wall, but rather like riding a bike once you've done it, it soon comes back to you! So after a good few hours I have scribed about half the row of houses. Using photographs I have matched the most significant stoned and hopefully captured the individual nature of the walls. 

Here you can see the blanked of fire places which suggest the row was built in a way that suggests they expected to extend it further. The ship building industry took off in Borth y gest at the time this row was built and photos show that the level ground to the right of these houses became an area used as wood yard where timbers for ships were prepared. They obviously realised that the level ground was more important for industry rather than housing.
The left hand end of the row has distinctly different different stonework using much more mortar than stone. This photo shows the transition from one texture to the other. The windows have all been filed back to shape but still need sills to be fitted and blended in.
One of the most satisfying things about scribing your own stonework is that it allows corner stones to be modelled really convincingly.
The base board is now in the garage until the weather turns too cold. This allows an operators eye view of the layout for the first time. 

Wednesday 13 August 2014

The walls have been strengthened with card inserts to prevent warping. These make the walls very strong. Some can be removed later once the Das clay has dried to ease fitting of windows.

 The walls are painted with dilute PVA.
 The Das is rolled out to a 1mm thickness


Sheets of Das are pressed onto the walls.
 The window and door apertures are roughly pushed through.
 The once pristine card shell now looks rather ragged, but this will change once the surface is sanded and the corners filed to shape. The far end of the row is of rendered stone which will be created using a different technique. I am going to experiment sprinkling a PVA surface with sand or pepper for this.
The chimneys are prepared separately and will be fixed in place once the windows and roof is in place. The whole shell is now left to dry thoroughly before carving the stone courses can start.

Monday 11 August 2014


It just goes to show why research is important. Having remeasured using more recent research the resulting model (the one on the left) is significantly smaller than the one I started two years ago!
There are many oddities within this row of cottages, it wasn't until today that I realised that the chimney breast is off centre and that the eves are a different height on each side. Only little differences, but they make a big difference to capturing the overall character. These are the joys of modelling vernacular architecture from a specific location My aim is for the buildings and landscape to be as accurate as possible with only the railway being conjecture.
Once I have added strengthening to the inside of the walls I will coat the model in PVA and add a thin layer of Das air drying clay. This will be sanded and then marked out using photos,  before carving the stone courses with a rat tailed file. The left hand cottages have walls with more mortar than stone, these will not be scribed but painted in the way described in the Pendon modelling cottages book.


The newly found picture at the top of the page showed that the tall thin window was one of a pair and an original feature. I had assumed it had been added more recently. I imagine it is where a stair case links the tree floors. To the right of the tall window there is now a full height extension but this was added after 1937, there was a lower extension before this date. The 1937 Francis Frith photo I am using shows this structure as having a flat roof but it is not clear how it was built. It looks like rendered stone and this is how I am going to model it. It looks like the full height extension was made by building directly on top of the lower extension, I wonder what the building regs were like in those days?

Having taken over a hundred new photos of the village in the last week, I have gone back over the measurements. The original mock up of the houses are slightly too big so I am starting from scratch marking out on a sheet of Daler board. I placed a four foot walking pole in key photos for reference and this has allowed me to calculate levels and heights of walls. Buildings in 5.5 mm scale are pretty big!


Without exact architects drawings there is a lot of drawing and re drawing before the board is ready to cut. There are some complicated bits to resolve such as the eves of the roof as you can see in the top picture, with deep overhangs on the older houses and virtually none on the later ones. The road is only gradually climbing here but the end houses are entered by steps which creates an illusion that the road is steeper than it is. The bay windows and veranda's won't be seen from the front of the layout but are lovely features of houses in this area. 

What has become apparent is that the road on the baseboard needs to be lowered by about 15mm which will need some fairly major surgery. The road levels are a compromise as I have omitted a whole row of houses to reduce the size of the model, this means that the gradient of the road has to be steeper than in real life.

This is the middle row of houses which will be shortened on the model. 

Sunday 10 August 2014

During the last week I have been in Wales which has provided opportunities to do further research for the model, it also gave me the chance to pop into the Corris Railway museum and view my old layout 'Dulas'. Its now fourteen years since it was donated to the railway but looks as fresh as the day we left it there. Society members have installed a shuttle system to allow the train I left with them to run back and forth. The loco with its scratch built chassis continues to run really well, albeit a lot faster than when we were exhibiting! Here my boys are looking at the Aberlleffenni section.


It's been a good chance to look at livery and details of carriages to be built this winter. The colouring of the 1930s rake seems to have improved, perhaps with revarnishing or the effects of coal firing, but the colours seem to be really close to those in the few colour photos I have seen of the colonel Stephens era. It shows the need for the lighting on the model to be tweaked as the the photos of my Welsh Pony give the impression I have painted it in a yellower shade of green than this. The colour swatches were made in day light and were if anything a slightly darker and bluer shade than this.